

TerryH
-
Posts
760 -
Joined
-
Last visited
-
Days Won
4
Content Type
Profiles
Forums
Events
Store
Everything posted by TerryH
-
It's all about education, and the best educator is a big fine.
-
Looks like a version of the Quigley cripple pattern. Google the name and you'll find lots of videos and step by step instructions. Here's a couple of photos of a green drake version that I tie. This is what it should look like before the hackle. And this is after the hackle is tied in.
-
They were doing mandatory boat inspections for boats coming into Canada at Coutts yesterday.
-
to get away from this? An otherwise great day on the Missouri.
-
Hope you had a good B'day Clive, perhaps with some fishing even.
-
Murray, the extended body is based on a technique that I developed (sure I'm not the first to do it) when designing this green drake pattern. The basic idea is to cut a strip of closed cell foam (of appropriate colour) and attach it to a long needle held in the vise. In the case of the green drake, the foam is wide enough that you can thread it on the needle, and then apply dubbing and ribbing as you would on the shank of a fly. In the case of the damsel, I cut a foam strip that is very narrow (~ 1mm tapered to a point at the tail) so you need to wrap it onto the needle with tying thread. It is important to compress the foam enough that when you pull the finished abdomen off the needle, the foam will expand and maintain tension on the thread wraps. The abdomen is done with five or six marabou fibres -- tie in to form the tail, then twist the remainder and wrap it forward to form the abdomen. Tie off, whip finish, and pull it off the needle. I usually crank out a number of these before moving on to constructing the complete fly. The hook is a #12 TMC 2457. The steps are 1) attach the eyes, 2) attach the abdomen 3) tie short sections of 0.02" lead along each side of the hook shank to widen the body and add weight, 4) dub the back half of the thorax (olive antron), 5) tie in the legs on either side (green mallard flank), 6) dub the forward half of the thorax up to just behind the eyes, 7) tie in a strip of thin skin for the wing case (mottled oak, olive), 8) lightly dub over the tie-in point on the wing case and figure eight over the eyes. 9) whip finish at the eye. The dumbbell eyes are made using 30lb mono and small glass beads (~1.5 mm dia.). Use a lighter to melt and form a ball on one end of a short section of line, string on the beads, trim the other end, and form a ball on that end to keep the beads in place. As you might have guessed, I am a firm believer in extended body flies. The green drake is my go to green drake pattern. I haven't tried the damsel yet. In designing this pattern, the main objective was that the extended body be very flexible, so that it would show motion in the water when stripped. If you've ever seen a damsel nymph swimming, there's a lot of wiggling that happens in the back half.
-
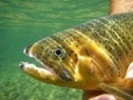
Some damselfly nymphs
-
Thanks guys. Terry
-
Some pike food. These guys sure use up a lot of deer hair -- might have to get Monger to kill me a couple of whities. Terry
-
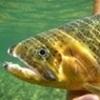
It's neat when that happens. I had the same situation with a cutty that I caught and which my buddy then caught exactly a month later. The fish was living behind the same rock both times.
-
One suggestion I can pass on, is to set things up so that you have as large a working surface as possible. When I get serious about tying, my entire desk gets covered with stuff, especially when I'm doing pike flies. My tying table is a computer desk that I built years ago and have since converted. Initially I had all the plastic storage boxes sitting on the desk top, which cut the working area almost in half. So I built the shelf that the storage boxes sit on now. I still don't have enough work area or storage space -- nobody ever does -- but I get by. Terry
-
Another Stupid Posting Pictures Question
TerryH replied to troutlover's topic in On The Water - Fishing Related
To resize, just right click on the *.jpg file, and select edit from the dialogue box. That'll open MS Paint. Select "resize" from the menu and away you go. -
Top Producing Terrestrial Flies
TerryH replied to FlyTyer16's topic in On The Water - Fishing Related
When the going gets tough, and you're dealing with a picky fish, it's always worth tying on an ant pattern. This is especially true in the fall, when a most of the aquatic bugs are done. Terry -
Hey Don, that one looks a lot like your "Office."
-
X2
-
How About Those Stampeders
TerryH replied to fishinglibin's topic in Off The Water - Not Fishing Related
I thought I heard that same noise on Saturday night too. -
Used Waders After Repairing To Many Times
TerryH replied to hatman's topic in On The Water - Fishing Related
I know someone who cuts the feet off their old waders and uses them as rain pants. Probably not too stylish, but it probably works. -
http://www.skicastle.ca/whatsnew.cfm?wnid=208
-
I've used a SPOT for a couple of years now, and highly recommend them. I fish a lot of areas that are out of cell coverage and the SPOT allows me to do this by myself.
-
Champion Generators From Costco
TerryH replied to PeteZahut's topic in Off The Water - Not Fishing Related
If they're in series, then your trailer's electrical system is seeing 24V. Did you mean to say "in parallel?" -
Is There A Valid Arguement For Barbles
TerryH replied to DonAndersen's topic in On The Water - Fishing Related
That's good enough reason for me. Although I've been fishing barbless for years, I don't recall any difference in my catch rate when I made the switch to barbless. Therefore, I'll be fishing barbless forever, regardless of what the regs say. Terry -
As others have mentioned, contact cement is the way to go. The key thing is to use multiple coats, especially on the felt side. Three or four coats is not too many. It's very easy to do. Terry
-
You also might consider making a sandwich of two or three layers of the thin sheets. I do this for some foam fly patterns. Use one of the 3M spray on adhesives.
-
Your Opinion, Retiring In Canada To Fish
TerryH replied to fishinglibin's topic in On The Water - Fishing Related
The wind varies a lot depending on where you are. Lundbrek, Pincher Creek, Fort Macleod -- look out. Inside the mountains, i.e. Blairmore and Coleman, I don't find it a problem at all. Terry -
Provincial Real Estate Fee
TerryH replied to fishinglibin's topic in Off The Water - Not Fishing Related
It's just in Toronto -- called the land transfer tax. I'm not aware of other jurisdictions in Ontario with a similar tax, but there could be some. The Toronto tax is part of the tax and spend legacy of Toronto's previous lefty pinko mayor. More info here: http://www.toronto.ca/taxes/mltt.htm
