

Roast
-
Posts
255 -
Joined
-
Last visited
-
Days Won
8
Content Type
Profiles
Forums
Events
Store
Everything posted by Roast
-
Warm Temps In Calgary - Cause For Concern?
Roast replied to jpinkster's topic in On The Water - Fishing Related
I wouldn't be AS concerned if dams were managed in a way that would allow reasonable flows of water throughout the summer. This new business of draining dams to prepare for flood season will put a lot if stress on fisheries like the bow unless we get some rain. I admit that I don't know about the new policies, however are snowpack and sustainable flows being factored in at all? Would love some more info on how decisions are being made. -
Its tough to get anything done having a two year old around. But I found some time over the past few weeks and built a rod dryer. I also made a practice rod to try some epoxy work on some rough wraps. I only put on one thinned coat. Here were the results: The practice rod was made from a glass rod driveway marker from home depot. Its quite a bit more white than my rod, however I didn't like how the natural silk wraps appeared yellow. Seeing the results, I changed one of the ferrule wraps that was natural silk color to match the guides. The first coat of thinned epoxy is on all the guides and the rod is in the dryer. I hope to have everything done by the weekend. Will post the final results when all is done.
-
Very cool tip. Reading the comments on the article, someone mentioned the j-knot. I looked it up and it sounds like it is stronger than a blood knot and easier to tie. I am going to give both a try: https://www.youtube.com/embed/lsc3hPFPwB4
-
Great read, looking forward to the next.
-
I am about done half of the guides with the the black tipping. This is what it looks like: I like the contrast and it will match the reel seat. I didn't have any luck finding an old microwave, so I picked up a bbq rotisserie motor to build the rod dryer. Hopefully this weekend I can finish up with the wraps then start building the dryer.
-
No I only wrapped up the guide feet. I had a good chunk of time to work on the rod yesterday and was able to start adding the natural silk colored tipping. I am hoping that the natural tipping will be almost invisible when the epoxy is applied. Once that is all done, I will add the next color of tipping which I am thinking about switching to black
-
Been a while since I did an update. I finally got all the guides wrapped in grey: The next step is adding the natural silk tipping.
-
Welcome to the forum, I would suggest checking out this: http://flyfishcalgary.com/board/index.php?showtopic=23519 thread. Lots of good info I what guys are currently running for nymph rigs:)
-
A possible alternative: http://countrypleasuresff.blogspot.ca/2012/03/monday-tips-and-techniques-nymph.html
-
Hi Matt, Good to hear that your building one out as well. If I like the 686, the 476 or a Steffen would be next on the list. Did you go 4pc or the new pack light 5pc? What color? It would be cool to see some pictures of your build so far. For a rod dryer I'm going to diy it. I'm going to try to find a used rotisserie motor of microwave turntable motor. I have 4 guides wrapped in grey so far and will try to find more time this week. I wish I could have bought it when it was -10 out. Any chunk of free time I have during the day is spent fishing.
-
Thanks Conor, I will definitely try some tests with epoxy. I do think the wraps a bit tight based on how the water absorbed. Haven't had any more time to work on the rod, hopefully I will later this week
-
Thanks Conor, that's a good suggestion. I haven't tested with epoxy. I tried soaking the test wraps with water and this was the result Will epoxy be a lot different than this?
-
Yesterday I tracked down some silk for the thread wraps. The kit came both natural and black 100 wt silk. I wanted to use some color since the blank is white. Quality 100 wt silk can be hard to find, however a local quilting shop, 'Along Came Quilting', had a full selection of both 100 wt (thin) and 50 wt (thicker) Japanese silk from yli. Previously I had some shipped up from the states but it was nice to see the colors first hand. I ended up buying light grey and light orange silk. Each spool was around $7.00. A little pricey, however I can use any left over on flies. Here are the spools: I tried two different test wraps. The wrap on the left has orange and grey tipping and the other has natural and orange tipping. I think that I prefer the natural and orange. The natural will hopefully disappear leaving the orange tipping to stand out. My test wrap was on the second thickest rod section, and I anticipate some frustration when working on the tip section.
-
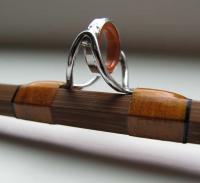
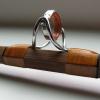
Thanks for the tip Colin, its good to know other options Last night I attached the grip and reel seat. The first step was to dry fit everything to determine how much of the blank needed to be sanded. I am really impressed with how well everything fits together right out the of the box. The grip is pre bored and perfectly matches the blank. The end of the grip was also ported for the reel seat and it matches perfectly. Nothing required any adjustment, just assemble and mark the blank. Next was to figure out the length of the reel seat and mark the blank The reel seat fits right over the but of the blank, which makes everything a lot easier. I didn't need to glue a stent into the blank. I used drywall fiberglass mesh tape to build up the arbor. The next step was to carefully apply the epoxy and slide everything together at let it set over night. As I said, Im quite impressed with how everything fits, A+
-
I was in the shop a while back and I think they said warranty replacement was around $160 but loomis would have a new rod to you in under a week.
-
The denatured alcohol is for thinning the epoxy on the first application. If I couldn't find any, I was going to use acetone. Acetone is pretty toxic stuff and I wanted to avoid it if possible. I was able to pick up some ethyl alcohol (denatured alcohol) from petrocraft products off of memorial and barlow. It was $7.95 for 250 ml. They had a smaller container (~70 ml) but given how hard this was to track down, I decided to get the next size up.
-
Started the build this weekend. The first step was to inspect the blank, no issues that I could see. Next was spining and marking the blank. One suggestion I found online was to use a piece of glass so that the blank rolls easily and doesn't dig into the surface your applying pressure to. Next was to mark the guide locations. This is where I have run into the first small snag on the build and I believe it is due to the recent switch from 3pc to 4pc. The guide placement chart that came with the rod states that the highlighted guide (the 6th) would be close to a ferrule. On my blank it does not. I checked with the online guide spacing chart and it's different than the one they sent. I believe it's the updated one, however I have contacted swift to find out. http://s650.photobucket.com/user/B_Line/media/A42D553F-A17F-4D23-B223-47AA6812619C.jpg.html]http://i650.photobucket.com/albums/uu229/B_Line/A42D553F-A17F-4D23-B223-47AA6812619C.jpg[/url] I have marked the blank based on the online guide and will change it if necessary. On the denatured alcohol search, I think I have tracked down a source (petrocraft products) and will go later this week. None of the drugstores I contacted carried it.
-
Still haven't had a chance to begin the build process, however I hope to get going this weekend. I haven't been totally idle, I have been gathering additional items for the build as well as re-reading the instructions. I needed to pick up some razor blades to cut the silk, some blue masking tape to place the guides, and get some denatured alcohol. I found everything but the denatured alcohol. The instructions say to get some from a drugstore, and not a hardware store as the hardware store varieties can be dyed. I checked my local shoppers drug mart and they don't have any so I'm still on the hunt. I also picked up a pack of colored china markers while at home depot. The marker that came shipped with the rod is white, which makes it hard to see on a white blank. It would work, however having more contrast will make things easier. As for some of the other comments, I believe that blanks that are trout sized are transparent, but still no word on their gender;) Their 8 wt and 12 wt rods may be a more solid color, but I don't know. Mine kind of glows when you put it in direct sunlight. See the image below of some other colors in the sun: http://www.headhuntersflyshop.com/wp-content/uploads/2015/07/epic_rods-1024x576.jpg As for the price of the blank, yeah they're expensive. When I started looking at these, our dollar was on par with the US, and I have been watching the price steadily increase. When I was originally looking, the kit price was about $475-$500. However I had to sell some fishing stuff before I could get one, so I had to wait until I had saved up;) They aren't as expensive as a Tom Morgan blank, but they are on the high side for glass. Carl designed the tapers and owns them and has a company called CTS make them in New Zealand. At the fishing show I took a hard look and cast a blue halo. Those blanks as roughly $100 USD less than an epic. The 5wt blue halo was quite soft, and I don't think it would be well suited for heavier nymphs and streamers. The only other option was the 7wt, which was a bit heavy, and I don't currently own any 7wt gear. I was drawn to the idea of making my own rod, so I never really considered a butterstick. However it is a lot of money to pay for something that you can potentially screw up. I'll be taking my time and hopefully all will go well. The closest graphite that I have cast might be a redington classic trout. I haven't cast one of those in a long time so I might be way off. I will have a better impression when it's fully built and I can actually cast a line. I'm not a real gear nut who has tried dozens of rods so I'm not the best guy to ask. I think that I have read the new orvis superfine glass 6wt may have a similar action to the epic, however I don't think shops like country pleasure stock the orvis glass rods.
-
It looks pretty standard. From their website: 'Every new Epic fly rod or blank that we produce is covered by our lifetime, original owner warranty. This warranty covers failure due to defects in material or workmanship of our product. Any Epic fly rod built by the Swift Fly Fishing company that fails due to misuse, negligence or normal wear-and-tear will be repaired or replaced at a nominal cost plus shipping at our discretion.' More info http://swiftflyfishing.com/pages/warrantees-and-returns I have heard of a few people breaking a tip through non-fishing related accidents (car door) and swift sent them a new tip section. No idea how much it cost.
-
The mail arrived today with something that I spent the past year lusting over, an epic 686 fiberglass rod. These blanks are from a small company out of New Zealand called Swift. I bought the rod as a ready to build kit, which the company offers. The only experience I have in the rod-building department is wrapping out a bamboo rod I purchased a couple years ago. For that I used spar urethane and this will be my first time using epoxy. I thought I would document the process, as these have been some of my favorite threads on other sites. I don't have any affiliation with swift, so you will get my unbiased views on the process from a beginners perspective. It should be fun. Why did I choose this rod? Currently my favorite rod to fish is a 7' 9" 5 wt bamboo rod. I like how you feel the rod load and unload when casting, and it makes hooking an average fish feel like a monster. However I struggle with it when using heavier nymphs and streamers. Also with the shorter length, mending is a little harder. The biggest downsides that I find are the metal ferrules, extra care required and I am always worried that I'm going to break it. I'm hoping that the 686 will be my go to rod for the bow. These rods have a reputation of being pretty bombproof and it will hopefully have the feel that I'm looking for. The 686 is highly regarded in the Fiberglass Fly Rod Forum and is considered fast... for glass. Putting the blank sections together and making a couple casts it's definitely a lot slower than any of my other graphite rods but quicker than the bamboo. Getting the Rod I ordered the rod online through their website. I asked a lot of questions before ordering and the owner of the company, Carl McNeil, was usually the one who answered. I thought that was pretty cool. I waited a little longer to place my order, as I had heard that they were in the process of changing the 686 from a 3pc to a 4pc. All reports say that swift has been pretty spot on in retaining the action when moving from 3pc to 4pc, but it's early days and there aren't a lot 4pc 686 rods in the wild yet. I liked the idea of having fewer pieces, however I've already checked and the 4pc will fit in my suitcase. I chose the 'nude' color just because I hadn't seen anything like. They have a bunch of colors and every now and again they will do a special edition. You can choose different grips (full wells, cigar, western) I chose western and what color your reel seat is, I chose black. I ordered the rod on Feb 29th, it was shipped from New Zealand on March 3 and I just got it today. I was pretty surprised by the speed. If you’re looking to order a rod, there is an online coupon: 'bigfish' that gets 10% off your order. Unboxing The packaging is pretty slick. The kit includes everything you need to build the rod. The box even converts to a rod-building stand if you don't have one. The rod tube is fiberglass, which I have never seen before. It's super light and feels really strong, it's also nice that it won't dent like aluminum. The cork looks to be nice quality and the grip is really comfortable. The other components look to be equally nice. Snake brand universal guides, ZiCr stripping guide, 100wt silk thread included as well as various epoxies This what came with it:
-
Crafting Cane: Bamboo Fly Rod Builder - Don Andersen
Roast replied to SilverDoctor's topic in On The Water - Fishing Related
Very cool video, thanks for sharing. I thought don was using a Morgan hand mill now. Cool to see the tools used, both bought and engineered like the rod binder. -
Last year I bought a dewalt dw 745. I thought that this was a good saw for me, as I'm not a pro, but still wanted a capable saw for projects at home. The rack and pinion fence is great but can only rip up to 20". The drawback to the saw is that the arbor isn't large enough to allow it to use a dado stack. I have a router table that I can use, however I really wish a dado stack was an option. You had to go up to the next level to get one that supports this and looking back I kick myself a bit. The other drawback is there isn't a really good place to clamp a feather board on the table surface and you cant use the magnetic ones due to the aluminum base. All things to think about. I thought I just needed a basic saw, but it doesn't take long for your eye to wander. I paid $260 through lowes online when they were having one of their web only sales, our dollar didn't suck and everything was 15% off;) $400 for a Bosch sounds really good, especially if it includes a stand. I think that dewalt wants over $100 bucks for a basic scissor stand thats usually not included.
-
Totally agree, really enjoyed his presentation. He is such an excellent teacher who really drives home the message: as long as you're having fun, your doing it right. Trout, carp, tenkara, czech nymphing, big streamers... who cares. I think that many fly fisherman loose sight of this. I also loved both of Borgers sessions today. He is the foil to resenbauer, as his presentations have a more serious tone. He is a weath of knowledge, and I like his scientific approach to the sport, for me that's fun. They're both great. As for the show, ya it's similar to other years. But where else can you try the latest rods when it's -10 C outside. It got me excited for spring and has given me a kick in the but to start tying for next season.
-
Just checked out the website for the upcoming fly fishing expo. I am really excited to see Gary Borger coming back this year. I really enjoyed his seminars a couple years back. Also really excited to see Tom Rosenbauer. During the winter I love listening to his podcast while tying flies. It's also great to see Mr McLennan back to share his knowledge. Looking forward to attending the expo this year! http://www.flyfishingevents.com/presentation-schedule.html
-
Fishing With Fiberglass Rods
Roast replied to SilverDoctor's topic in On The Water - Fishing Related
Cabelas (USA) has their cgr Fiberglas rods 60% off today only. http://www.cabelas.com/product/CABELAS-CGR-FLY-RODS/1873450.uts
