Roast Posted March 15, 2016 Author Share Posted March 15, 2016 The denatured alcohol is for thinning the epoxy on the first application. If I couldn't find any, I was going to use acetone. Acetone is pretty toxic stuff and I wanted to avoid it if possible. I was able to pick up some ethyl alcohol (denatured alcohol) from petrocraft products off of memorial and barlow. It was $7.95 for 250 ml. They had a smaller container (~70 ml) but given how hard this was to track down, I decided to get the next size up. Quote Link to comment Share on other sites More sharing options...
CDone Posted March 16, 2016 Share Posted March 16, 2016 I use lacquer thinner to thin my epoxy (Thread Master), been using it for over 15 years with no issues. Colin Quote Link to comment Share on other sites More sharing options...
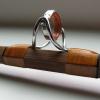
Roast Posted March 17, 2016 Author Share Posted March 17, 2016 Thanks for the tip Colin, its good to know other options Last night I attached the grip and reel seat. The first step was to dry fit everything to determine how much of the blank needed to be sanded. I am really impressed with how well everything fits together right out the of the box. The grip is pre bored and perfectly matches the blank. The end of the grip was also ported for the reel seat and it matches perfectly. Nothing required any adjustment, just assemble and mark the blank. Next was to figure out the length of the reel seat and mark the blank The reel seat fits right over the but of the blank, which makes everything a lot easier. I didn't need to glue a stent into the blank. I used drywall fiberglass mesh tape to build up the arbor. The next step was to carefully apply the epoxy and slide everything together at let it set over night. As I said, Im quite impressed with how everything fits, A+ 5 Quote Link to comment Share on other sites More sharing options...
Sage Posted March 17, 2016 Share Posted March 17, 2016 ^^ Looks fantastic so far! Quote Link to comment Share on other sites More sharing options...
Roast Posted March 18, 2016 Author Share Posted March 18, 2016 Yesterday I tracked down some silk for the thread wraps. The kit came both natural and black 100 wt silk. I wanted to use some color since the blank is white. Quality 100 wt silk can be hard to find, however a local quilting shop, 'Along Came Quilting', had a full selection of both 100 wt (thin) and 50 wt (thicker) Japanese silk from yli. Previously I had some shipped up from the states but it was nice to see the colors first hand. I ended up buying light grey and light orange silk. Each spool was around $7.00. A little pricey, however I can use any left over on flies. Here are the spools: I tried two different test wraps. The wrap on the left has orange and grey tipping and the other has natural and orange tipping. I think that I prefer the natural and orange. The natural will hopefully disappear leaving the orange tipping to stand out. My test wrap was on the second thickest rod section, and I anticipate some frustration when working on the tip section. 1 Quote Link to comment Share on other sites More sharing options...
bigalcal Posted March 18, 2016 Share Posted March 18, 2016 I'm really enjoying this thread,,,Thanks for letting us in on your project, Great comments too!!! Quote Link to comment Share on other sites More sharing options...
Conor Posted March 19, 2016 Share Posted March 19, 2016 Make sure to test some with the epoxy. Either on the butt or similar colored dowel. That grey particularly will have a very different look when varnished. 1 Quote Link to comment Share on other sites More sharing options...
Roast Posted March 21, 2016 Author Share Posted March 21, 2016 Thanks Conor, that's a good suggestion. I haven't tested with epoxy. I tried soaking the test wraps with water and this was the result Will epoxy be a lot different than this? Quote Link to comment Share on other sites More sharing options...
Conor Posted March 21, 2016 Share Posted March 21, 2016 That depends how particular you are! It would be very similar, but wraps are slightly different with each different varnish method. If your not picky, you probably wouldn't notice. Always worth checking though. I like that look quite a bit. The dark grey looks great on the light blank. I have a light grey build pending and cheated and got NCP nylon for it, because I want the light grey look. 1 Quote Link to comment Share on other sites More sharing options...
Roast Posted March 23, 2016 Author Share Posted March 23, 2016 Thanks Conor, I will definitely try some tests with epoxy. I do think the wraps a bit tight based on how the water absorbed. Haven't had any more time to work on the rod, hopefully I will later this week Quote Link to comment Share on other sites More sharing options...
matt1984 Posted March 23, 2016 Share Posted March 23, 2016 What are you doing for a rod dryer? I am currently building the same rod in a 7'6 4 weight. I have only done a few test wraps so far, hoping to make some progress this week. Thinking I may try to make a dryer out of a rotisserie motor. Quote Link to comment Share on other sites More sharing options...
Roast Posted March 24, 2016 Author Share Posted March 24, 2016 Hi Matt, Good to hear that your building one out as well. If I like the 686, the 476 or a Steffen would be next on the list. Did you go 4pc or the new pack light 5pc? What color? It would be cool to see some pictures of your build so far. For a rod dryer I'm going to diy it. I'm going to try to find a used rotisserie motor of microwave turntable motor. I have 4 guides wrapped in grey so far and will try to find more time this week. I wish I could have bought it when it was -10 out. Any chunk of free time I have during the day is spent fishing. Quote Link to comment Share on other sites More sharing options...
matt1984 Posted March 24, 2016 Share Posted March 24, 2016 I went with the 4 piece. I actually meant to order the red but apparently messed up my order and got the amber. It actually looks pretty cool though, so I kept it. Interested to see how the dryer turns out, I have been trying to decide the best way to go about making one. I will try and get some pics when I make a little more progress. The bow has been fishing too good and eating most of my spare time too! Quote Link to comment Share on other sites More sharing options...
Roast Posted April 4, 2016 Author Share Posted April 4, 2016 Been a while since I did an update. I finally got all the guides wrapped in grey: The next step is adding the natural silk tipping. 7 Quote Link to comment Share on other sites More sharing options...
Dangus Posted April 5, 2016 Share Posted April 5, 2016 You wrapped between the eyes? Style points? Quote Link to comment Share on other sites More sharing options...
Roast Posted April 5, 2016 Author Share Posted April 5, 2016 No I only wrapped up the guide feet. I had a good chunk of time to work on the rod yesterday and was able to start adding the natural silk colored tipping. I am hoping that the natural tipping will be almost invisible when the epoxy is applied. Once that is all done, I will add the next color of tipping which I am thinking about switching to black 5 Quote Link to comment Share on other sites More sharing options...
Conor Posted April 5, 2016 Share Posted April 5, 2016 Nicely done wraps. Quote Link to comment Share on other sites More sharing options...
Roast Posted April 8, 2016 Author Share Posted April 8, 2016 I am about done half of the guides with the the black tipping. This is what it looks like: I like the contrast and it will match the reel seat. I didn't have any luck finding an old microwave, so I picked up a bbq rotisserie motor to build the rod dryer. Hopefully this weekend I can finish up with the wraps then start building the dryer. Quote Link to comment Share on other sites More sharing options...
ÜberFly Posted April 8, 2016 Share Posted April 8, 2016 Yup Black is better then the orange Quote Link to comment Share on other sites More sharing options...
Roast Posted April 28, 2016 Author Share Posted April 28, 2016 Its tough to get anything done having a two year old around. But I found some time over the past few weeks and built a rod dryer. I also made a practice rod to try some epoxy work on some rough wraps. I only put on one thinned coat. Here were the results: The practice rod was made from a glass rod driveway marker from home depot. Its quite a bit more white than my rod, however I didn't like how the natural silk wraps appeared yellow. Seeing the results, I changed one of the ferrule wraps that was natural silk color to match the guides. The first coat of thinned epoxy is on all the guides and the rod is in the dryer. I hope to have everything done by the weekend. Will post the final results when all is done. 4 Quote Link to comment Share on other sites More sharing options...
Roast Posted May 5, 2016 Author Share Posted May 5, 2016 Finished up the rod this weekend. Ended up putting on 4 thinned coats of epoxy. Overall I'm very happy with the results Casting: Line used: SA GPX Line 6wt (used for majority of test) Also tried: Rio Indicator 6wt Reel: Hardy Golden Prince 7/8wt Its only been out to the neighborhood school field, but all I can say is WOW! The rod is accurate at typical fishing distances and really smooth. I brought a hoola hoop with me and I had the yarn landing on target most of the time. It casts nicely off the tip, however add a few hauls and the line just sails out of the guides. I have never been great at distance casting, but with this rod I almost had the backing knot through the guides. Not super practical for the fishing that I do, but it was really fun. I attribute the distance to the increased feel as it was easier for me to feel when to apply power. I have never had better looking loops. Overall: This was a great experience. There really is something to building your own rod, and I would recommend going the kit route to anyone that hasn't built a rod before. Almost everything that you need was included and the components fit very well together. There are a few moments that will be a little nerve wracking (any time epoxy is used), but it added to the experience. My only suggestion is to order so that it arrives in winter. I am going to head to the river tomorrow to see how it does on the water. The next question is what to build next.... a Steffen 3/4 or epic 476. Hopefully by next winter I know. 7 Quote Link to comment Share on other sites More sharing options...
CDone Posted May 5, 2016 Share Posted May 5, 2016 Nicely done, really like your colour choices. Colin Quote Link to comment Share on other sites More sharing options...
muha Posted May 5, 2016 Share Posted May 5, 2016 Beauty! Quote Link to comment Share on other sites More sharing options...
mtnflytime Posted May 5, 2016 Share Posted May 5, 2016 Excellent process updates and story. I also like how the black guide wraps match the reel seat. Quote Link to comment Share on other sites More sharing options...
Dangus Posted May 5, 2016 Share Posted May 5, 2016 Guess you'll see how it casts into the wind 😆She ugly out there today. What'd u do for bubble management? Quote Link to comment Share on other sites More sharing options...

Recommended Posts
Join the conversation
You can post now and register later. If you have an account, sign in now to post with your account.
Note: Your post will require moderator approval before it will be visible.